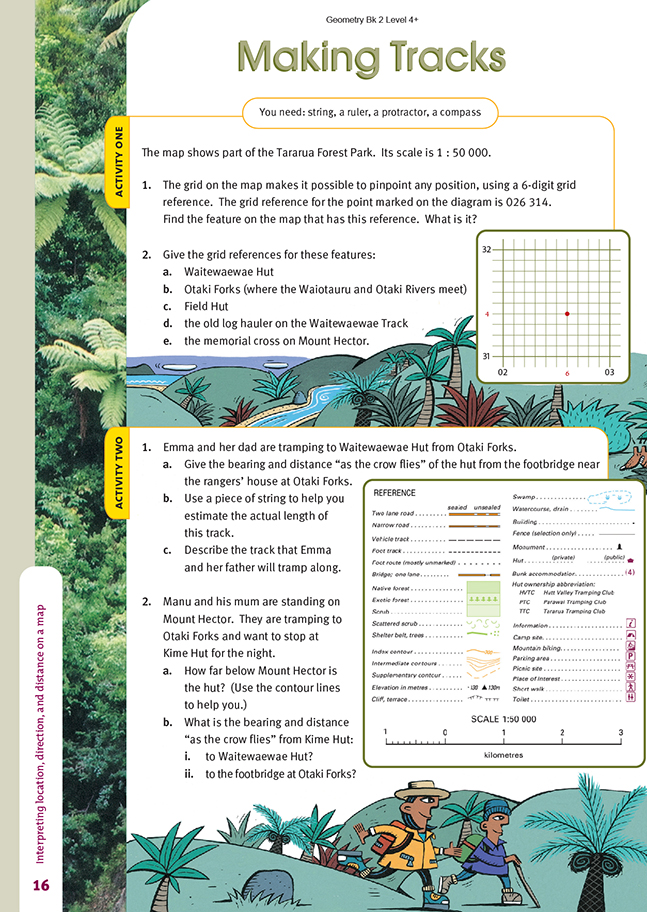
Making Tracks
This is a level 5 geometry strand activity from the Figure It Out series.
A PDF of the student activity is included.

Click on the image to enlarge it. Click again to close. Download PDF (909 KB)
interpret location, direction and distance on a scale map
string
ruler
protractor
compass
FIO, Level 4+, Geometry, Book Two, Making Tracks, page 16
New Zealanders have a tradition of using the bush, mountains, and wilderness areas for recreation, tourism, and scientific purposes. Therefore, it is important for students to be able to locate features on a map and plan a route. This activity uses part of a sheet from the latest series of 1 : 50 000 topographical maps. This is the kind of map that would normally be used when tramping.
Activity One
Question 1 shows students how 6-digit grid references are used to specify a precise location. Note these points:
- The east-west reference is given before the north-south reference.
- The first 2 digits in each group of 3 are found on the map. (They are printed in blue and are not easy to see.)
- The third digit in each group of 3 has to be estimated or measured. To do this, the reader needs to imagine each cell of the grid divided into tenths in each direction.
In question 2, the students use the reverse process. Various features are given, and the students have to determine the grid references for each of them.
Ideally, the students should practise their estimation skills when specifying the references because this is what people usually do in practice, but they could use a ruler if they find the estimation difficult. The grid lines form squares that are 20 millimetres by 20 millimetres. This means that every 2 millimetres represents
1/10 of the width or height of a cell. Waitewaewae Hut is located on the (imaginary) vertical line that passes through the point 10 millimetres along from 04. 10 millimetres equates to 5/10 of the distance, so the reference is 045. A similar process finds the north-south reference.
Activity Two
This activity gives students experience at working out bearings and distance on a map.
To answer question 1a, the students should:
- place the edge of a sheet of paper on the map so that it runs through the footbridge and the Waitewaewae Hut symbol
- place the centre of their protractor on Otaki Forks and rotate it until the 0 degrees line is oriented to the north (parallel to the vertical grid lines on the map)
- read the angle (measured clockwise) between north and the direction of the hut (represented by the edge of the sheet of paper) and write the angle as a 3-digit number in the format 053o
- use their ruler to measure the straight distance from Otaki Forks to the Hut. It is about 14.8 centimetres, so the distance is approximately 7.4 kilometres.
When doing question 1b, students are told to use a piece of string, but they could use a narrow strip of card marked off in centimetres. This could easily be bent to follow the turns of the route. If these methods prove too fiddly, they may be able to use their rulers, measuring small sections of the track at a time to take account
of the bends.
For question 1c, the students could talk about:
- the direction of various sections of the track (for example, south-west to the first footbridge)
- the features along the way (for example, bridges, the old log hauler, valleys, streams, or a bend in the river)
- the distances to various features
- the ups and downs of the track (using information given by the contour lines).
Students need to use the fine brown contour lines when answering question 2a. Each line represents a difference in height of 20 metres.
To answer question 2b, the students use the same strategies as in question 1a, but this time they centre their protractors on the symbol for Kime Hut. The bearing to the footbridge at Otaki Forks is about 337o .
Those using a standard 180 degree protractor will have to make sure that they measure the correct angle and that they don't forget to add 180 degrees to their result.
As a possible extension, the students could investigate a topographical map that covers their own area. Because it would be a full sheet, it would cover a greater variety of terrain and give the students more features to describe, locate, and interpret. Local maps are usually available from local book stores and sports shops
that specialise in tramping gear. A parent may be willing to loan a map.
Answers to Activities
Activity One
1. Penn Creek Hut
2. (Because it is difficult to read the references exactly,
the last digit in each group of 3 may vary by 1.)
a. 045 393
b. 983 352
c. 999 309
d. 012 365
e. 019 258
Activity Two
1. a. The bearing is 053o (measured clockwise from north, as always). The distance "as the crow flies" is approximately 7.4 km.
b. The approximate actual length is 9 km.
c. Answers will vary. Possible ideas include:
- The track lies roughly in a north-east direction and is fairly straight.
- After crossing a second footbridge, the track wanders across open, fairly level ground before heading up a valley.
- The track continues up the valley with little climbing until it comes to an old log hauler at about the 4 km point.
- After this, the track runs next to a creek and climbs steadily until it reaches a plateau at about the 6 km point.
- For the next kilometre, the track is fairly level at an altitude of about 500m.
- The track then descends to the Otaki River for about 1 km.
- For the final kilometre, the track skirts around a bend in the Otaki River and across a small ridge before it reaches the hut.
2. a. About 130 m. (Mt Hector is 1 529 m, and Kime Hut is on the 1400m contour line.)
b. i. The bearing is 013o, and the distance is about 13.1km.
ii. The bearing is 337o , and the distance is about 8.9km.