X Marks the Spot
This unit uses games and puzzles to explore coordinate systems and their uses. The students are given the opportunity to invent their own systems by locating counters on a sheet of paper and by finding the dead centre of a set of objects. The Cartesian and polar coordinate systems are used to locate position on maps. Polar coordinates are also used to describe certain loci (sets of points with a common property).
- Use Cartesian and polar coordinates to describe the position of an object.
- Find the location of an object using Cartesian or polar coordinates.
This unit emphasises the value of coordinates to locate the position of objects in the plane. Two coordinate systems are presented. One is the Cartesian system that uses horizontal and vertical distances from a fixed point (the origin). The other is the polar coordinate system that uses angles about a fixed line and distances from a fixed point on that line.
Students may well have seen the Cartesian system before as it is the one commonly used on road maps, and maps generally. It was invented by a French mathematician called René Descartes. You’ll read his story throughout the course of the unit. The origin of the polar coordinate system is less clear. Both systems describe some complicated curves simply though the unit does not go into functions at higher levels of the Curriculum. Students are likely to see polar coordinates as an interesting curiosity at this point. However, Cartesian coordinates provide the basis of a great deal of work that is undertaken in the senior secondary school. Here algebra and geometry are brought together to form a powerful combination that enables some interesting problems to be solved. Most of the calculus in school is built around the application of algebra to geometry via the Cartesian coordinate system.
The learning opportunities in this unit can be differentiated by providing or removing support to students and by varying the task requirements. Ways to differentiate include:
- acting out the finding of locations with Cartesian and polar coordinates by walking on a large grid. You might use tape or chalk to mark out a grid on the carpet of your classroom, or create the grid outside on a concrete surface. Walking to specific points can be linked to computational thinking by creating a sequence of instructions.
- directly modelling the locating of points for your students - using an “I do, we do, you do” approach.
- modelling the finding of an angle with a protractor using the concept of an angle as a turn
- limiting the complexity of the coordinates you use. At the beginning of this unit, learners might focus on using whole number values and angles that are easy divisions, such as 45⁰. More proficient students might use decimals, such as (4.7, 5.6), and angles, beyond 90⁰, that are complex divisions of 360⁰ (e.g., 27⁰ or 135⁰).
- asking students to work collaboratively to support each other. In this way you can share the expertise of proficient students in the class, and allow students the opportunity to be both learners and teachers (tuakana-teina).
Differentiation involves changing the context of activities to suit the interests of your students. The unit uses quite traditional contexts such as battleships and pirates. Students will find using locations in their local area engaging, but also be prepared to use locations they are less familiar with, such as other towns/cities or landmarks in Aotearoa. Students might become more engaged in sports they prefer such as basketball, hockey and netball, than golf. Professional sports coaches gather a lot of detail about the locations of their players during games. Data is recorded using coordinates that are stored in tracking devices. Traditional settings also provide contexts for study. Māori call the North Island “Te Ika-a-Māui” (the fish of Māui). There were no aeroplanes then. How did they know the island was shaped like a fish? What reference system did pre-European Māori use to navigate?
Te reo Māori vocabulary terms such as taunga tukutuku (Cartesian coordinates), ine-koki (protractor), putu (degree), taunga (location), huapae (horizontal), and poutū (vertical) could be introduced in this unit and used throughout other mathematical learning.
- Rulers
- Copies of a Cartesian coordinate system (Copymaster 1)
- Counters
- Large sheets of paper (newsprint is good)
- Copies of the "dead" centre for some objects (Copymaster 2)
- Street maps of the local area
- Copies of the golf hole (Copymaster 3)
Session 1: Four Counters
This lesson introduces the Cartesian coordinate system using a game with four counters and "Battleships".
- For this activity students need to work with a partner. Consider pairing more knowledgeable students with less knowledgeable students to encourage tuakana-teina throughout the session. Each student will require a large sheet of paper (A3 or bigger), coloured crayons, and four counters of different colours.
- Before students start the activity, explain the rules below and allow them enough time (e.g. a few minutes) to think about how they might want to prepare their sheets of paper to help them with the challenge. This gives them a chance to develop some form of reference system for location.
- The students take turns to place four counters on their sheet of paper. One counter must be in each quadrant (quarter) of the paper and no counters can be on the edge. The counters do not have to be placed symmetrically though the actual position of the counters is up to the individual student. Once a student has put the counters in place they must give their partner instructions for locating the counters. The nature of these instructions is up to the student themselves. The other student must then mark on their own paper the location of the counters using an X in the appropriate coloured crayon. At no stage is the second student allowed to see their partner’s paper while placing their X, nor do the players have access to rulers or protractors.
- Once the Xs are marked the players compare the locations of the counters and the corresponding Xs by overlaying the marked paper. Measurements of difference can be taken if you wish.
- When the majority of students have finished, bring the class together to discuss their methods. Pairs of students could share with other pairs, before presenting their ideas to the class. Expect that students will have devised some reference system. These may include coordinate grids, specific reference points or conventions involving length and direction. Inform them that they have re-invented systems for location which were created centuries ago in response to similar problems involving finding positions of objects, particularly in navigation and warfare.
- Share the story of René Descartes, a famous French mathematician and philosopher. Descartes enjoyed sleeping in and while doing so noticed a fly on the ceiling. Not wishing to get out of bed himself he wondered how he could tell a servant the exact location of the fly. Thus, he invented the coordinate system known as Cartesian coordinates after René himself. Students will enjoy the story more if they can act it out. Get a student to be the servant who goes to a corner of the room and follows these instructions: "Go three steps across and two steps up. Now splat the fly!" Emphasise the importance of knowing which direction is across and which is up. After all, the spot represented by (3,2) is not the same spot as (2,3).
- Students may wish to play the game "Battleships" to reinforce the convention that the horizontal value is given first and the vertical value second. That is, (5,6) refers to the location 5 units across and 6 units up. "Battleships" is played on a Cartesian coordinate grid. Each player has their own copy of this grid, which is masked from their opponent. They nominate and shade some points on the plane to represent battleships. A destroyer might be represented by two adjacent coordinates, a cruiser by three adjacent points, an aircraft carrier by four coordinates in a 2 x 2 square, etc. Players take turns to have shots at each other’s battleships by calling out a coordinate. This is met by the response "hit", where the coordinate is part of a battleship or "miss" if it is not. A battleship is sunk when all of the coordinates representing that battleship are discovered. The first player to sink all their opponent’s battleships is the winner.
Session 2: Buried Treasure
X can represent the position of a counter. More traditionally it represents the spot where pirate treasure is buried. We now follow that theme.
- Maps invariably have a coordinate system of some kind so that the location of streets, landforms or other features can be found quickly. This idea can be reinforced easily by giving students a copy of the street directory and the map of a local town or city and asking them to locate certain landmarks. This could be linked to other relevant learning by providing maps from your local area, from areas which your students whakapapa to, or of areas from the past.
- In turn, they can set problems for others by giving the coordinates of landmarks and requiring others to find them.
- An interesting activity is to play "Pirate’s Treasure". Each group of students receives a map of the school with a coordinate system superimposed on it and four or five items of treasure (play money) to hide. The coordinate system should be numerical with two-digit numbers marking the lines on the map (eg. 00 for zero, 01 for one, 12 for twelve etc).
- Discuss with the students how a location can be described very precisely by using a six-digit reference. The third and sixth digits are like a decimal reference, which more accurately define the horizontal and vertical distances. For example the coordinate below could be given as 015 008.
5. Each group goes outside and "buries their treasure" marking its location on their map of the school. They return to the classroom and provide another group the five coordinates, which describe where the pieces of treasure are located. The other group attempts to find the treasure of the first group using the coordinates provided.
Session 3: Dead Centre
Use the Copymaster 2: Dead Centre in this session.
The dead centre of a town is in the middle of all the houses, shops and workplaces. Here we get the class to think about the location of the real "dead" centre of a set of objects. In this situation we mean the point that is in some sense in the middle of these objects.
- Discuss what the term "dead centre of town" means. Encourage ideas like, "exactly in the middle", "the oldest part of town", and "where all the shops are." Suggest that towns and cities do not always grow symmetrically, especially where waterways and landforms intervene, so the centre of town is not always the oldest part or where the main shopping centre is located.
- Pose the following scenario. Each picture shows ten dots. These dots represent where ten people from the same club live. They want to meet in the place that is in the "dead centre" of all their houses. Find a way to work out where that centre is. Point out that the dead centre will be the place that minimises (makes smallest) the total travel distance that the club members need to get there. (You might say that they are looking for a new place to locate their clubhouse.)
- Using spatial estimation supported by measurement is a cumbersome way to find the centre. It is, however, likely to be the preferred option of some groups. Some guidance may be necessary. Since the houses in Scenario One are almost co-linear this is the easiest arrangement to work out by measurement methods. However, since the houses are not the same distance apart the process is more complicated than might at first be thought. An idea of average is likely to emerge. This might take several forms such as, "If we get the centre exactly the distances of points on the left will add to the same as the distances on the right," or, "We measured the distances of each house from the left-hand house and found the average distance. That told us how far to the right the centre was." The point that minimises distance to the counters (corners of a triangle) is called the Fermat Point, named after another famous mathematician. It is located at the average of the x coordinates and the y coordinates.
- This concept of averages is potentially powerful when faced with the more difficult Scenarios Two and Three. Remind the students that they have used coordinates previously to describe location and that these number pairs might have some use in the dead centre problems. Consider a simple case.The points have a coordinate system superimposed on them, so they have number pairs of (1,3), (2,1), and (4,2), respectively. Finding the average of the horizontal (x) coordinates gives (1 + 2 + 4) ÷ 3 = 2.33. The average of the vertical (y) coordinates gives (3 + 1 + 2) ÷ 3 = 2. So the point (2.33, 2) gives the centre of the three houses.
- Get the students to apply the average method to Scenarios Two and Three. This method can also be used to establish whether the school is in the "dead centre" of where students in your class live. Using a street reference the location of each student’s house can be described using coordinates. These can be loaded into a spreadsheet, x-values in one column, y-values in the other, and each column averaged using a function formula. The location given by the averages will define the dead centre of where students in your class live.
Session 4: Polar Coordinates
In this lesson we introduce polar coordinates.
- Polar coordinates use angles and distances to define location. A common example of this is found in nautical navigation where a destination can be described using a compass bearing (given in degrees clockwise from north) and a distance (usually given in nautical miles). For example, you might say "the port is 100 nautical miles away at a bearing of 75 degrees".
In mathematics, positions in polar coordinates are defined in a similar way.
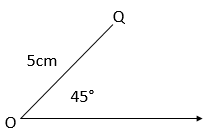
The location of a point Q can be described in relation to point O, the origin. Q is described by the angle between the line OQ and the horizontal (x) axis and by the distance OQ (see diagram).So polar coordinates (45°, 5cm) describe the location of the point Q.
- Polar coordinates can be used to play a game of golf. A Copymaster is included as an example of how a polar golf course is designed. Each player begins at the origin marked at the bottom left. They play their first shot by estimating the angle and distance to the first hole (shown at the base of the flag). The landing point of the shot is found by measuring using a protractor and ruler. The next shot is taken from the landing point and all references for angle and distance are taken from that new point.
- A player gets the ball in the hole if the landing point is within the black circle at the base of the flag. If any of the hazards are landed on, the given number of penalty points are added. Start the next hole from the origin.
- The winner is the player who has the lowest score at the end of the game.
- Students will enjoy making up their own golf holes. A3-size paper gives a more difficult exercise. You may like to use several pages to create a complete golf course of 18 holes.
- For an additional challenge, students could have the origin in the middle of the page, meaning that their first shot may have an angle of more than 90°.
Session 5: Coordinate Puzzles
This lesson provides an application of polar coordinates to revise and strengthen the work of the previous session.
- Coordinate puzzles are both a good way to reinforce the finding of locations described by number pairs and also to highlight the relative strengths of rectangular and polar coordinates systems. A coordinate puzzle consists of a set of coordinates that students transfer to a coordinate system and join the points in the order that they are given. The result should be a figure that they recognise.
- Consider for example, the set of polar coordinates: (0°, 4cm), (45°, 4cm), (90°, 4cm), (135°, 4cm), (180°, 4cm), (225°, 4cm), (270°, 4cm), (315°, 4cm), (360°, 4cm). Get students to plot these points on a polar coordinate system. This results in a set of points. If connected by straight lines these points form the corners of a regular octagon or if connected by smooth curves form a circle. Taking the circle scenario, tell the students to give the coordinates of other points that also lie on the circle. Ask them how we might have anticipated that the points given before would form a circle. (They are the same distance from a fixed point). This puzzle highlights the power of polar coordinates in describing figures with rotational symmetry.
- Below are three other coordinate puzzles for the students to complete. When they have done so, get students to create their own coordinate puzzles for a partner to solve.
Puzzle One: (5,10), (3,7),(0,5), (3,3), (5,0), (7,3), (10,5), (7,7).
Puzzle Two: (0°, 0cm), (45°, 1cm), (90°, 2cm), (135°, 3cm), (180°, 4cm), (225°, 5cm), (270°, 6cm), (315°, 7cm), (360°, 8cm), (0°, 9cm), (45°, 10cm), (90°, 11cm), (135°, 12cm), (180°, 13cm), (225°, 14cm), (270°, 15cm), (315°, 16cm), (360°, 17cm).
Puzzle Three: (5, 6), (6, 5.9), (7, 5.7), (8, 5.4), (9, 4.8), (10, 3), (9, 1.2), (8, 0.6), (7, 0.3), (6, 0.1), (5, 0), (4, 0.1), (3, 0.3), (2, 0.6), (1, 1.2), (0, 3), (1, 4.8), (2, 5.4), (3, 5.7), (4, 5.9), (5, 6).
Dear family and whānau,
This week we have been looking at coordinate systems that are used on maps to give the exact location of landmarks. Usually, we use rectangular coordinates on maps but your child has also been learning about polar coordinates.
Ask your child to show you how to play golf on paper using polar coordinates. Who is the best shot in your whānau?