A Measured Response
The purpose of this unit is to have students identify a need, plan a response, seek feedback, design and build a ‘product’, applying number, measurement and technology knowledge and skills.
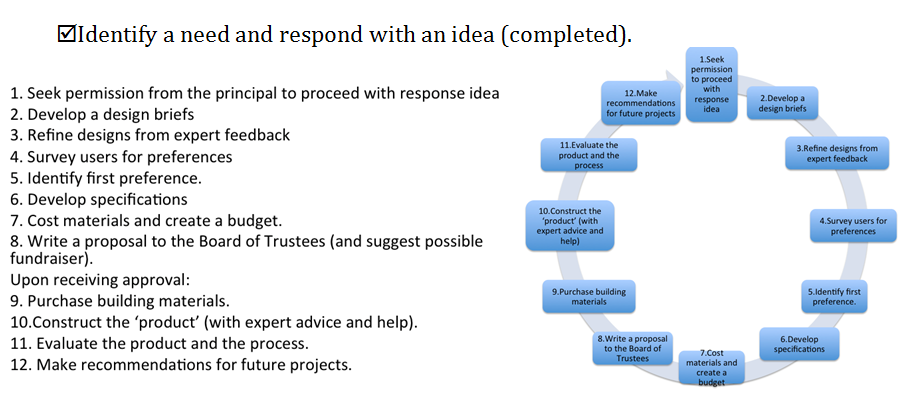
- Identify a utility need or opportunity within the school and plan a response .
- Create a design incorporating key attributes identified.
- Investigate quality and comparative costs of possible construction materials.
- Cost ‘fit for purpose’ construction materials and prepare a budget.
- Draw plans with measurement specifications.
- Apply number knowledge and strategies to develop a fundraising plan.
- Apply precision measurements to product manufacture.
- Evaluate the product quality and technology process.
When students are comfortable with and efficient in measuring and estimating using appropriate standard units, their learning experiences should provide them opportunities for practical applications of their knowledge and skills. This is the focus of these sessions.
At level 4 students are consolidating their understanding of measurement units of length, kilometre, metre, centimetre, millimetre, they are applying their knowledge and skills using rulers and tape measures, and making conversions between metric units using whole numbers and commonly used decimals. As they engage in practical tasks and use measuring devices, they refine their ability to estimate approximate measurements and to read scales with accuracy in order to make precision measurements to the nearest millimetre.
As students draw plans they learn to apply a scale factor as they reduce three-dimensional shapes to two-dimensional mathematical drawings in which the invariant properties are recognised. As students create a product from a scale plan, they apply the inverse scale factor to the measurements of the product’s component parts.
In the construction tasks, students are also required to apply their understanding of angle. They should be able to read a protractor to the nearest degree, build on their level three understanding of right angles, obtuse and acute angles, and know the degree value of angles that are simple fractions of a whole turn of 360°. For example, as a student uses a bevel angle tool to gauge the inner angle between a sloping table leg and the table top they recognise an acute angle that must be kept the same for each of the four table legs. This angle can be accurately measured with a protractor, and the bevel tool can be set at the desired angle. Students will have opportunities to discover the advantages of using a set-square to ensure that appropriate corners in the construction are 90°.
Students need to ensure that their recording of measurements is accurate and that appropriate abbreviations and symbols are applied.
As students are calculating metric conversions between length measurement units, and as they work with prices and quantities, they will be applying their knowledge of decimal place value, using known multiplication facts and applying a range of advanced additive and multiplicative number strategies.
Associated Achievement Objectives
Technology
Technological Practice
- Justify the nature of an intended outcome in relation to the need or opportunity. Describe the key attributes identified in stakeholder feedback, which will inform the development of an outcome and its evaluation.
Technological Knowledge
- Understand that material can be formed, manipulated, and/or transformed to enhance the fitness for purpose of the technological product.
- Calculators
- Pencils and erasers
- Paper
- Camera
- Construction tools: eg. hammer, saw, level (if the construction project is a small one, consider searching for preschool carpentry supplies online.)
- Construction materials: eg. wood, nails
- Measuring tools: eg. tape measure, set square, protractor, adjustable bevel angle tool
- Connected 3, 2005, p2. Our Pātaka
Learning activities
This unit involves the practical construction of a (wooden) ‘utility item’ for the school. (For example: a picnic table, an outdoor seat or bench, a small shelter fence, a bird table or nesting box, a small junior cubby house, a garden planting box.)
In implementing this unit, consider the size and management of the participant group. There are many implementation possibilities, but you may like to consider one of these three models:
- The complete project is undertaken by a small, identified group in the class.
- Several parallel projects are undertaken by a number of small class groups.
- Different groups within the class take responsibility for separate parts of the project. (project management, scoping, survey, design, costing, fundraising, material ordering and acquisition, construction, communication and public relations)
Session 1
This session is about having students recognise that there is a need or opportunity to create a ‘utility item’ to enhance the school environment.
SLOs:
- Identify a practical need or opportunity within the school.
- Plan a response to the identified need.
Prior to the lesson
- Have two students take a series of photographs, or a short video (without people) of the school indoor and outdoor environment.
- Have these ready to display on the data screen or on a large poster.
Activity 1
- Begin the session by having student silently look at photographs or a video of the school environment.
- Together, brainstorm aloud physical features or facilities that the students like/appreciate in their school environment.
- Together, brainstorm man made features or structures that could enhance the environment (indoors or outdoors), or that would meet needs that student have already identified.
Make small pieces of paper available to students. - Have each student write their ‘number one’ idea for a small structure (utility item) that the class could construct to meet a need or to enhance the school environment.
Collect, collate and photocopy these, sufficient for each pair of students to have one copy of the collated ideas. - Together list several criteria that should be considered in making a decision about the best ‘construction’ idea:
For example: useful and meeting an identified need, able to be used by all members of the school community, environmentally friendly, culturally appropriate, affordable, within the construction capabilities of the students (with professional technical advice support), enhancing the environment. - Have student pairs use the agreed criteria to evaluate each idea and to decide on the best idea with justification.
- Share these and reach a collective decision. (For example: a strong, long outdoor seat that will be permanently located in a shaded but clearly visible area of the school grounds.)
Activity 2
- Have student pairs discuss and draw an action plan/flow diagram of the process that they think will need to be followed to achieve this idea.
Suggest that their process begins with seeking permission for the idea should include consultation with other students in the school. - Have student pairs share their plan with at least one other group, and refine their plans. Agree as a class on steps to implement their technology plan and how this will proceed. For example:
- Agree on how permission will be sought, fitting with school protocols. For example:
- A delegation/class representative makes an appointment, as soon a possible, to see the principal, seeking approval to proceed to the conceptual design stage.
- When the conceptual design and costing are finalised, a proposal should be developed by and taken to the Board of trustees for approval.
Activity 3
- Conclude the session by physically visiting the identified location for the ‘utility item’, noting pertinent environmental features.
- Return to class. Make paper available. Have individual students or student pairs draw a simple design brief for the ‘item’ they envisage.
When completed, have students post these draft designs on a whiteboard for all to see. Before the next session, have students tick on the whiteboard below no more than four of their favourite designs.
Session 2
This session is about students using expert advice to inform detailed scale plans of a particular design and a construction budget.
SLOs:
- Seek feedback from stakeholders (students or the wider community).
- Create a design incorporating key attributes identified.
- Investigate quality and comparative costs of possible construction materials.
- Seek expert advice (technology teacher/carpenter).
- Draw plans with measurement specifications.
- Cost ‘fit for purpose’ construction materials.
- Prepare a budget.
Prior to the lesson:
- Check that permission has been sought from the principal, and given to proceed.
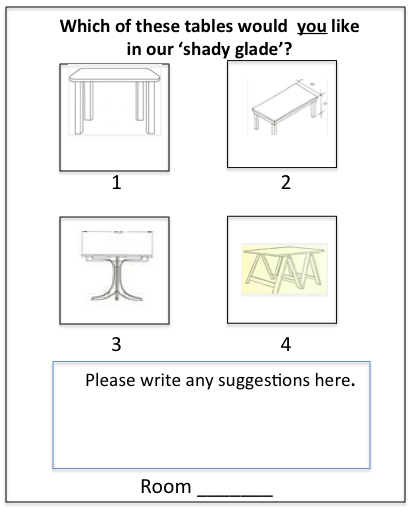
- Have the four designers together create a simple survey sheet seeking school-wide preferential ratings for the designs. Number the designs. Make a copy for each room in the school. For example:
- Arrange to have an expert carpenter come to the session. Give him/her a copy of the preferred designs to consider before coming to class.
- Request that the carpenter bring an appropriate carpentry product pricelist (and if possible small material samples).
- Make copies of the price list for students.
Activity 1
Begin by introducing the expert (carpenter) to the class.
Recognise the four most popular product designs and display the survey sheet. See Session 1, Activity 3.
Have the four ‘winning’ designers explain their features and any construction details they had in mind.
Activity 2
Make paper and pencils available. Suggest that students take notes about each numbered design.
- Have the expert provide feedback about the viability of each design, identify any designs that are impractical or unsafe, make constructive suggestions for improvements, and outline for each viable design the practical considerations for its construction.
- Have the expert suggest realistic dimensions for each design, appropriate building materials (eg: 2inches x 4 inches/50mm x 100mm) that will be needed (with reference to the item on the pricelist), options related to the type of material (eg. tanalised timber, ply, particle board), additional materials needed (eg. nails, screws), any finishing products (stain, paint, urethane).
Have students note these with reference to the price sheet. - Have students refer to the agreed flow chart for process and ask questions of the expert to clarify any aspects of the process, related to design, material purchase or construction that they are unsure of.
- If appropriate, have a student volunteer invite the expert to return when construction gets underway, to guide and offer advice.
Activity 3
Make paper, pencils and rulers available.
Have students each select their personal favourite of the four options, and draw a detailed scale plan of this. Suggest that students use a 1cm:10cm scale.
They should take into account the measurement dimensions (and construction materials suggested by the expert).
Before they begin.
A. Discuss and use questions to elicit from students an understanding that scale is:
- Used on maps as an indication of the relationship between the distances on the map and the corresponding actual distances.
- The relationship between two sets of dimensions or measurements of an object, and a different size copy of the same object.
That a scale plan is:
- An exact smaller two dimensional version of the item in real life (3D).
- A drawing or two-dimensional diagram that should include enough information to allow the builder to make the product.
- Is a drawing in proportion where the correct relationship is maintained between the size, shape and position of the different parts of the object.
- A drawing where the measurements are proportionally adjusted, but in which there are invariant properties: the centre point and angles do not change.
Have students give examples in which the scale factor is 1/10. For example:
1/10 or 0.1 of (x) 1.5m or 150cm in real life is 15cm on the scale drawing
1/10 or 0.1 of (x) 0.8m or 80cm in real life is 8cm on the scale drawing
B. Optional
If the expert’s measures include inches, discuss imperial measurement.
Explain that in construction a 4 x 2 (four-by-two) used to be a commonly heard measure. It referred to 4 inches x 2 inches. It has been suggested by some sources that the origins of the British Imperial system were based on the human body with an inch being a ‘thumb’, a foot, or 12 inches, being a foot and a yard being the distance between your outstretched hand and your nose. Other suggestions have agricultural references such as an inch being three barleycorns. Explain that this is the system of measure in the USA. |
and conversions:
| Imperial (or US) | Metric |
| 1 inch | 2.54 cm |
| 1 foot (12 inches) | 0.3048 m |
| 1 yard | 0.9144 m |
| 1 mile | 1.6093 km |
| Metric | Imperial (or US) |
| 1 mm | 0.039 inches |
| 1 cm (10 mm) | 0.39 inches |
| 1 m (100 cm) | 1.093 yards |
| 1 kilometre (1000 m) | 0.621 miles |
Activity 4
Allow time for the students to develop their scale plans.
Activity 5
Make available to each student a copy of Attachment 1. Discuss.
Have students who have drawn the same design form pairs work together, using the price list for current supply prices for the building products, and prepare their own budget showing estimated costs for the construction materials for their design.
Activity 6
Have students who promptly complete 6, deliver the survey information sheets to the other classes in the school, asking for time to explain the project and asking that the classroom teacher give an opportunity for students to vote on their personal design preference.
Ask the teacher to record on the sheet the number of votes for each design.
Activity 7
Make available copies of Connected 3, 2005, p2. Our Pātaka, for the students to read and consider.
Session 3
This session is about planning a fundraising venture to pay for the planned ‘utility item’.
SLO:
- Apply number knowledge and strategies to develop a fundraising plan.
Prior to the session:
- Ensure that user feedback from all classes has been received and collated.
Activity 1
Identify the design that is preferred by the other students in the school.
Take notice of any additional suggestions. Discuss the merits of any deserving of consideration.
Activity 2
Have students who drew a scale plan for and prepared a budget of estimate of costs for this design, share their plans and budgets.
Have students justify and explain their plans and costs.
Activity 3
- Number and display these. Give all students time to examine each design and costing sheet that has been developed for the preferred design.
- Using the guide from Session 2, Activity 4 agree as a class on the best scale plan and costing sheet to adopt.
A scale plan should be a drawing or two-dimensional diagram that should include enough information to allow the builder to make the product.
Activity 4
- Place an order for the necessary materials with the preferred supplier.
- Brainstorm the tools that will be needed. List these. Check with the caretaker, which of these are available in the school.
Activity 5
- Make available copies of Connected 3, 2005, p2. Our Pātaka, and refer to the fundraising example in the article.
Suggest that funds could be raised for this project. - Have students work in pairs to develop a fundraising plan and to prepare a proposal for the Board of Trustees.
Make available Attachment 2 and discuss each section. - Have students together write a brief letter to the Board of trustees, introducing the construction project and the fund raising plan.
Attach the plan to the letter. - Ensure that these reach the BOT.
Session 4
This session is about applying precision measurement skills to complete the construction of the ‘utility item’.
Whilst key teaching points are detailed, the practical implementation will depend on the actual fund raising plan, the construction project and the classroom organisation.
Photograph the construction as it proceeds.
Prior to this session:
- Confirm BOT approval of the building project and their choice of best fundraising plan.
- Assemble construction materials and tools as required, including measuring devices: tape measures, level, set square, adjustable bevel angle tool, protractor.
- Arrange for the carpentry expert to be available to support in the construction process.
- Ensure a camera is on hand to capture the manufacturing process.
SLOs:
- Select appropriate measurement tools.
- Apply precision measurements to product manufacture.
Activity 1
Confirm the BOT decision with the students and discuss the implementation plan for both the fundraiser and the building project.
Activity 2
Before construction begins, explore each measuring device and have the students to model precision measurement with each.
Place in front of the student a range of relevant measuring devices.
Tape measure
- Notice where measurements begin (right at the right angled ‘tag’ on the end).
- Recognise 10 mm = 1cm, check other conversions (for example 53mm = ☐cm, 140mm = ☐cm, etc.)
- Recognise 100cm = 1m and practice a range of conversions between mm, cm, m and combinations of these.
- Record measurements and model decimal notation.
- Use the stop button to stop retraction.
- Keep the tape flat against the timber.
- When marking a measured length with a pencil, make a mark then use a set-square to draw the straight cutting line.
- Discuss the level of precision required to complete the task.
Set square
- Identify the metric (and the imperial measures).
- Have students approximate conversions between measures cm/mm and inches (optional).
- Recognise that the angle is 90° and a right angle.
- Model placing the black black ‘arm’ along the straight edge and recognise that the yellow arm is perpendicular to that edge.
- Check the right angle with a protractor.
Protractor
- Have students draw a range of specified angles and mark which are acute and which obtuse. Discuss.
Adjustable bevel angle tool
- Model how to set the tool at a particular angle.
- Have student practice doing this and checking the angle with a protractor.
- Have students give examples when this tool could be used.
Spirit level
- Ask what the tool is used for.
- Explain that spirit level or bubble level is designed to indicate whether a surface is horizontal (level) or vertical (plumb).
- Have students model its use.
Activity 3
Review safety instructions relevant for construction tools being used. For example hammers, saws, drills.
Activity 4
Have students check all building materials against the order list.
Activity 5
Proceed with construction.
Session 5
This session is about students evaluating the product, the process and on the mathematics that they have applied.
SLOs:
- Evaluate the product quality and technology process.
- Identify mathematics skills applied to the technology process.
Prior to the session:
- Have students photograph the finished product from a range of angles.
- Arrange an event to celebrate the completion of the project.
Activity 1
Make copies of photos of the production process and finished product available to each student (digital or hard copies.)
Have students make annotated posters documenting each stage of the construction process, including the specific mathematics applied at each step.
Activity 2
Have students critique the process and financial outcomes of their fundraising plan, including specifically evaluating their profit calculations and predictions.
Activity 3
- Have students evaluate the success of their technology plan by writing annotated comments beside each step of the plan, and listing suggestions for improvements to the process, should a similar project be undertaken in the future.
- Have them conclude by writing a statement explaining how they know if the product is fit for purpose and is what the stakeholders (majority of other students in the school) wanted.
Activity 4
Have students host an event to ‘launch’ the product.
Dear parents and whānau,
Thank you for your support with our building project _______________________ and with the related fundraising event.
Please come to our ‘opening’/launch on ___________________________ .
You are welcome to visit our classroom to see a presentation entitled ___________________.